[Docusaurus] 基本用法
檔案結構:
website                     # root directory of your site
├── docs
│   ├── my-first-doc.md     # 直接在 docs 底下新增 .md 文件
│   └── categoryName        # 在 docs 底下建立子分類資料夾
│       ├── page1.md        # 在子分類下新增子文件
│       └── page2.md
├── src
│   └── pages
├── docusaurus.config.js
├── ...
內容
Blog 文章
在 /blog 資料夾中新增 Markdown 文件(.md 或 .mdx),內容格式如下:
---
slug: my-first-post
title: 我的第一篇文章
authors: [你的名字]
tags: [標籤1, 標籤2]
---

這是我的第一篇文章內容。
Docs 文件
在 /docs 資料夾中新增 Markdown 文件(.md 或 .mdx),例如 intro.md,內容格式如下:
---
id: intro
title: 介紹
---

這是我的筆記介紹。
Sidebar
在文件 metadata 中設定 sidebar 的 label 與 position:
---
sidebar_label: "My First Doc" # 文件在 sidebar 的名稱
sidebar_position: 1 # 文件在 sidebar 的位置
---
Docusaurus 會根據 docs 資料夾結構自動產生 sidebar:
export default {
  tutorialSidebar: [
    {
      type: 'autogenerated',
      dirName: '.' // 從 docs 資料夾自動產生 sidebar
    }
  ],
};
也可以手動設定 sidebar 的結構:
export default {
  tutorialSidebar: [
    'intro',
    'hello',
    {
      type: 'category',
      label: 'Tutorial',
      items: ['tutorial-basics/create-a-document'],
    },
  ],
};
更複雜的 Sidebar 設置可以參考 Docusaurus 自家網站的配置:https://docusaurus.io/docs/sidebar#complex-sidebars-example
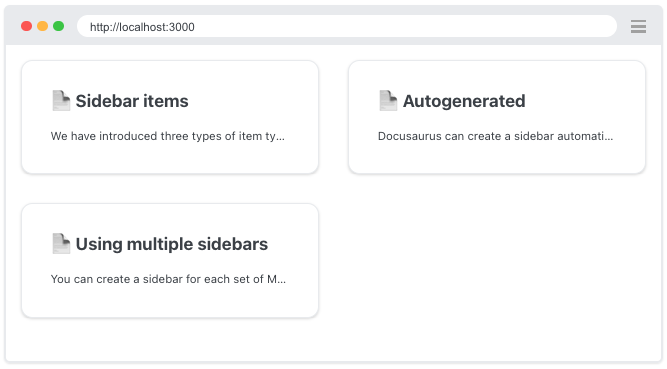
Sidebar items
Sidebar item 的 type 可以分成這幾種:
doc:連到 doc 頁面link:連到內部 or 外部的頁面category:可展開的階層式 dropdownautogenerated:自動建立 sidebar itemshtml:渲染 pure HTMLref:連到 doc
DocCardList
import DocCardList from '@theme/DocCardList';

<DocCardList />
Category item metadata
在 category 資料夾內建立 _category_.json 或 _category_.yml 設定檔,來設定 sidebar 分類的名稱、描述。
{
  "label": "分類 A",
  "position": 2,
  "collapsible": true,
  "collapsed": false,
  "className": "red",
  "link": {
    "type": "generated-index",
    "title": "分類連結的名稱"
    "description": "分類的描述"
  },
  "customProps": {
    description: "This description can be used in the swizzled DocCard"
  }
}
label:分類在 sidebar 的名稱position:分類在 sidebar 的位置link:為分類建立一個單獨的連結
Markdown Features
MDX
MDX (Markdown + JSX) 是一種結合了 Markdown 與 JSX 的標記式語言,讓使用者能夠在 Markdown 文件內容中使用 React 元件。Docusaurus 內建的 MDX compiler 會將 Markdown 文件轉換成 React components,因此我們可以在 Markdown 中撰寫 JSX(使用 JavaScript 邏輯與變數、插入 React 元件、將元件和內容模組化⋯⋯等)。
MDX compiler 支援 .md 與 .mdx 格式。為了一致性,Docusaurus v3 預設將所有檔案(不管是 .md 還是 .mdx 檔案)視為 MDX 格式處理。這樣做的好處是可以:
- 向後相容:即使過去使用了
.md檔案,Docusaurus 也會將其視為 MDX 檔案來處理,以確保使用者可以隨時插入 React 元件。 - 簡化使用者體驗:使用者不必特別區分文件格式,預設會使用 MDX 處理所有
.md和.mdx檔案。
MDX & React Components
在 Markdown 中使用 React components,。
- 自訂 Highlight 元件 (src/components/Highlight.jsx)
import React from 'react';

export const Highlight = ({children, color}) => (
  <span
    style={{
      backgroundColor: color,
      borderRadius: '20px',
      color: '#fff',
      padding: '0.2rem',
      cursor: 'pointer',
    }}
    onClick={() => {
      alert(`You clicked the color ${color} with label ${children}`)
    }}>
    {children}
  </span>
);


This is <Highlight color="#25c2a0">Docusaurus green</Highlight> !
This is <Highlight color="#1877F2">Facebook blue</Highlight> !
- 在 Markdown 中使用
---
title: MDX 互動示範
---

# 這是 MDX 文件

我可以寫 **Markdown** 搭配 *JSX*!

import { Highlight } from '@site/src/components/Highlight';

<Highlight color="#25c2a0">內嵌自訂元件</Highlight>

## Tabs 元件(多語言代碼)
```mdx
import TabItem from '@theme/TabItem';

<Tabs>
<TabItem value="js">```javascript
console.log('Hello MDX!');
```</TabItem>
<TabItem value="py">```python
print("Hello MDX!")
```</TabItem>
</Tabs>
內建 MDX 元件
- **Admonition**(提示框):
  > :::tip 提示
  > 這是提示訊息
  > :::

- **Tabs**:多版本內容切換
- **Accordion**:可折疊內容
- **CodeBlock**:互動程式碼區塊
Front Matter
Markdown 文件最上方是 Front Matter,以 YAML 格式撰寫、包覆在 --- 中。用來為 Markdown 文章加上 metadata,來設定文件的標題、標籤(tags)、位置等。
---
title: "my-first-doc"									# 文件標題
description: "This is my first doc" 	# 文件描述
tags: [npm, docusaurus]						 	  # 標籤
slug: /my-first-doc 									# 用來修改文件的 slug url,不寫的話默認為文件名
---
Standard Features
Links
使用 url path:
Let's see how to [Create a page](/create-a-page).
或是 relative path:
Let's see how to [Create a page](./create-a-page.md).
Images
- Markdown syntax
- CommonJS require
- Import statement
使用絕對路徑:

或使用相對路徑:


使用 CommonJS require 語句和 JSX image 標籤:
<img src={require('@site/static/img/docusaurus.png').default} alt="Docusaurus logo" />
使用 ES import 語句和 JSX image 標籤:
import DocusaurusLogo from '@site/static/img/docusaurus.png';

<img src={DocusaurusLogo} alt="Docusaurus logo" />
Code Blocks
Title
```js title="src/檔案位置/這邊可以放標題"
// your code...
function HelloDocusaurus() {
  return <h1>Hello, Docusaurus!</h1>;
}
```
// your code...
function HelloDocusaurus() {
  return <h1>Hello, Docusaurus!</h1>;
}
Line Highlighting
方法一:透過註解加上標記 (Highlighting with comments)
在 code block 中透過「註解」的方式來替特定行數畫記重點,這些註解並不會在最後顯示在程式碼區塊中:
- 標記下一行:
// highlight-next-line - 標記範圍內的程式碼:
// highlight-start與// highlight-end
```js
function HighlightNextLine(highlight) {
  if (highlight) {
    // highlight-next-line
    return 'This line is highlighted!';
  }

  return 'Nothing highlighted';
}

function HighlightMultipleLines(highlight) {
  // highlight-start
  if (highlight) {
    return 'This range is highlighted!';
  }
  // highlight-end

  return 'Nothing highlighted';
}
```
function HighlightNextLine(highlight) {
  if (highlight) {
    return 'This line is highlighted!';
  }

  return 'Nothing highlighted';
}

function HighlightMultipleLines(highlight) {
  if (highlight) {
    return 'This range is highlighted!';
  }

  return 'Nothing highlighted';
}
方法二:透過 metadata 加上標記 (Highlighting with metadata string)
在 code block 的語言後加入 metadata string 指定要 highlight 的行數:<語言> {<metadata string>}
- 單行(例如
3) - 多行:用逗號
,分隔行號(例如1, 3, 5) - 範圍:用範圍語法
-(例如2-4)
Docusaurus 使用了 parse-number-range 這個 library 來解析 metadata string 中的行數語法。
```jsx {1,4-6,11}
import React from 'react';

function MyComponent(props) {
  if (props.isBar) {
    return <div>Bar</div>;
  }

  return <div>Foo</div>;
}

export default MyComponent;
import React from 'react';

function MyComponent(props) {
  if (props.isBar) {
    return <div>Bar</div>;
  }

  return <div>Foo</div>;
}

export default MyComponent;
警告/提示區塊 Admonitions
:::note
This is a note
:::

:::tip[My tip]
Use this awesome feature option
:::

:::info[My info]
This is an info
:::

:::warning[My warning]
This is a warning
:::

:::danger[Take care]
This action is dangerous
:::
This is a note
Use this awesome feature option
This is an info
This is a warning
This action is dangerous
Docs-only mode
到 docusaurus.config.js 設定檔 -> presets -> docs 加上 routeBasePath: '/' 設定為網站的 root。
export default {
    // ...
    presets: [
        [
            '@docusaurus/preset-classic',
            {
                docs: {
                    routeBasePath: '/', // Serve the docs at the site's root
                    /* other docs plugin options */
                },
                blog: false, // Optional: disable the blog plugin
                // ...
            },
        ],
    ],
};